Comprehensive Guide to the Types of Residential Water Heaters

Types of Water Heaters

Hot water is one of those home comforts you don’t think about—until it’s gone. In Atlanta’s humid summers and chilly winters, an efficient, properly sized water heater keeps your showers steamy, your dishes sparkling, and your energy bills in check. Pick the wrong system, and you could face skyrocketing operating costs, cramped utility closets, or inconvenient “run-outs” of hot water right when you need it most.

This guide covers the pros, cons, costs, efficiency, and installation considerations for every major type of residential water heater. We’ll walk you through storage-tank, tankless, heat pump, and solar models helping you choose with clear, fact-based insights so you can choose the best option for your Atlanta home.

What Are the Main Types of Residential Water Heaters?

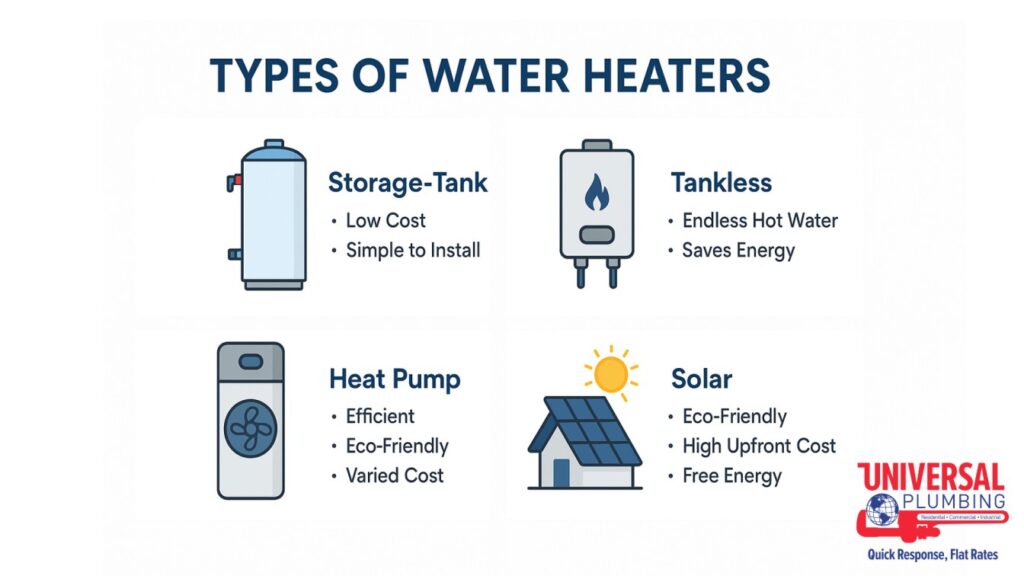
Grid showing four water heater types: tank, tankless, heat pump, and solar

There are four main types of residential water heaters: storage-tank (conventional), tankless (on-demand), heat pump (hybrid), and solar thermal systems. Each option offers distinct trade-offs in upfront cost, efficiency, and installation requirements. Your ideal choice will depend on your budget, available space, household hot-water demand, and long-term energy savings goals.

Storage-Tank Water Heaters

What is a storage-tank water heater?

A storage-tank water heater keeps a reservoir of hot water on standby, ready to deliver at the turn of a faucet. Storage-tank units heat incoming cold water in an insulated steel tank—typically 30–80 gallons—using a gas burner or electric elements, then maintains that temperature with periodic reheating cycles. In Atlanta homes, common models include the Rheem Performance Platinum® series (40–50 gal) and the A.O. Smith GPVX-75 (standard 50 gal), prized for their balance of reliability and serviceability.

What are the key attributes and values of storage-tank heaters?

  • Capacity: 30–80 gal (40 gal is most common for 2–3 person households)
  • Fuel Types: Natural gas, electric resistance, propane
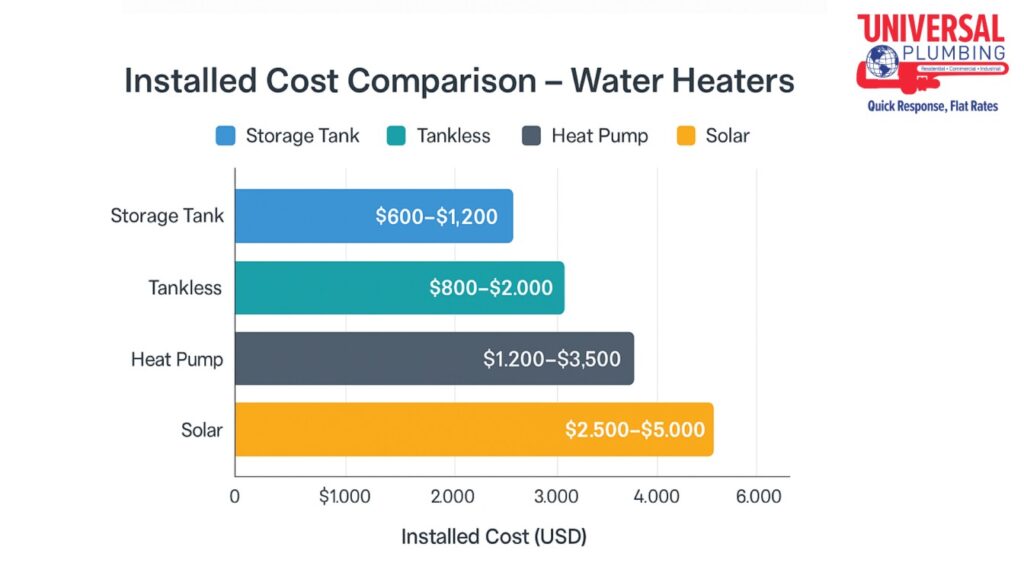
  • Average Installed Cost: $600–$1,200 (including labor)
  • Energy Factor (EF): 0.60–0.75 (EF measures thermal efficiency; higher is better)
  • Expected Lifespan: 8–12 years

What are the pros and cons of storage-tank water heaters?

Pros:

  • Lower upfront equipment and installation cost ($600–$1,200 vs. $800–$2,000 for tankless)
  • Simple retrofit into existing plumbing and venting
  • Familiar technology with widespread serviceability

Cons:

  • Standby heat loss (maintaining temperature 24/7 adds ~10–20% to energy use)
  • Larger footprint (requires a closet or utility area of at least 3 × 3 ft)

How much space and installation requirements does a storage-tank heater need?

Most storage-tank units demand a flat, level floor space of at least 36 × 36 inches, with 12 inches of clearance on all sides for service access. Gas models also require a vent pipe to the exterior and a ¾-inch gas supply line capable of 40–50 MBH input. Electric versions need a dedicated 240 V circuit—typically two 30 A breakers—and a water‐seal pan underneath if installed in an attic or above finished space. Integrated drain lines and pressure‐relief piping must discharge within 6 inches of the floor.

Tankless (On-Demand) Water Heaters

What is a tankless water heater?

A tankless water heater heats water on demand as it flows through a compact heat exchanger. When you open a hot-water tap, cold water enters the unit and is rapidly warmed by either a gas burner or electric heating element—eliminating the need for a standby tank.

In Atlanta, tankless systems have grown in popularity by 15–20% year-over-year as homeowners trade bulky closets for wall-mounted units and seek energy savings amid rising utility rates. Compact footprints and on-demand performance make them especially attractive for infill homes and kitchen remodels.

What are the key attributes and values of tankless heaters?

  • Flow Rate: 2–11 gallons per minute (GPM), with 6–8 GPM models ideal for two simultaneous showers
  • Fuel Types: Natural gas, propane, or electric
  • Average Installed Cost: $800–$2,000 (unit + labor; gas tends higher due to venting)
  • Energy Factor (EF): 0.82–0.99 (EF measures delivered hot water per unit energy input)
  • Expected Lifespan: 15–20 years (longer than storage tanks due to no corrosion from a tank)

What are the pros and cons of tankless water heaters?

Pros:

  • Endless hot water: No tank means you won’t run out during peak use.
  • Energy savings: Eliminates standby losses; can save 10–30% on water-heating bills.

Cons:

  • Higher upfront cost: $800–$2,000 vs. $600–$1,200 for a comparable tank model.
  • Electrical upgrades: Electric units may require a 200 A service or upgraded panel; gas units need proper venting.

How do I size a tankless water heater?

Measured in GPM, sizing a tankless water heater hinges on your peak hot-water demand. A typical two-bathroom Atlanta home needs 6–8 GPM capacity to run a shower and kitchen faucet simultaneously. Use our GPM sizing calculator to estimate your flow requirements—then choose a model rated at or above that value to ensure consistent performance.

Heat Pump Water Heaters

What is a heat pump water heater?

A heat pump water heater uses an air-source refrigeration cycle to extract ambient heat and transfer it into your water storage tank. Unlike conventional electric-resistance heaters, it moves heat rather than generating it, pulling warmth from the surrounding air—even in Atlanta’s mild winters—to achieve high efficiency.

In Atlanta’s year-round moderate climate (average winter lows around 35°F), heat pump units operate near their optimal Coefficient of Performance (COP), making them a strong choice for energy-conscious homeowners.

What are the key attributes and values of heat pump water heaters?

  • Coefficient of Performance (COP): 2.0–3.5 (delivers 2 to 3.5 times more heat energy than the electrical energy consumed)
  • Fuel Type: Electricity only
  • Average Installed Cost: $1,200–$3,500 (including labor and necessary electrical upgrades)
  • Expected Lifespan: 10–15 years

What are the pros and cons of heat pump water heaters?

Pros:

  • Up to 60% lower energy use: Uses ambient heat, reducing water-heating electricity by as much as 60% compared to resistance models.
  • Dual functionality: Some units offer a “hybrid” mode, switching to resistance elements during peak demand or low ambient temperatures.

Cons:

  • Performance drop in cold air: Below 40°F, efficiency can fall and recovery times slow, though rarely an issue in Atlanta’s climate.
  • Larger footprint & clearance needs: Requires about 1,000 ft³ of surrounding air space and 2–3 ft of clearance on top and sides.

What are the installation requirements and noise levels?

Heat pump water heaters need a level area of at least 36 × 36 inches and a ceiling height of 75 inches to accommodate the airflow coil on top. They draw and exhaust air up to 150 CFM, so installation in an unconditioned garage or basement is ideal to avoid cooling your living space.

Noise levels typically range from 45–60 dBA—comparable to a quiet dishwasher—so plan to locate the unit away from bedrooms or living rooms. Units also require a dedicated 240 V circuit (30 A) and a condensate drain to handle moisture from the heat-exchange process.

Solar Water Heaters

What is a solar water heater?

A solar water heater captures energy from the sun via rooftop collectors and uses it to heat domestic water, with a backup gas or electric element to ensure supply during cloudy days or high demand. Solar collectors—typically flat-plate or evacuated-tube—transfer heat to a fluid that circulates through a storage tank, delivering renewable hot water around the clock.

In Georgia, abundant sunshine makes solar water heating especially effective: homeowners can expect solar to cover 50–80% of annual hot-water needs before backup kicks in.

What are the key attributes and values of solar water heaters?

  • Collector Area: 20–80 ft² (two to six panels, depending on household size)
  • Fuel Types: Solar thermal primary with natural gas or electric backup
  • Average Installed Cost: $2,500–$5,000 (system + installation)
  • Expected Lifespan: 15–20 years (collectors often warrantied for 10–15 years)

What are the pros and cons of solar water heaters?

Pros:

  • Renewable energy source: Drastically reduces fossil-fuel use.
  • Very low operating cost: After installation, sunlight is free—typical annual savings of $200–$400 on water-heating bills.

Cons:

  • High upfront cost: $2,500–$5,000 vs. $600–$1,200 for conventional tanks.
  • Proper roof orientation is critical: Collectors must face south (±45°) with minimal shading for optimal performance.

What tax credits and local rebates are available?

  • Federal Residential Clean Energy Credit: 30% of system cost through 2032, applied to both collectors and installation.
  • Georgia Power Solar Water Heater Rebate: Up to $500 per solar collector (verify current availability with your utility).
  • Local Utility Incentives: Municipal utilities and co-ops may offer additional rebates—check with your provider for programs.

What are the performance and cost differences across water heater types?

Bar graph comparing water heaters by cost, efficiency, and lifespan

A side-by-side comparison of key attributes, cost ranges, and estimated payback periods helps Atlanta homeowners see which technology delivers the best value given local energy rates.

Attribute Storage Tank Tankless Heat Pump Solar
Capacity / Flow 30–80 gal 2–11 GPM 50–80 gal 50–80 gal
Fuel / Energy Source Gas, Electric Gas, Electric Electric Solar + Backup
Installed Cost $600 to $1,200 $800 to $2,000 $1,200 to $3,500 $2,500 to $5,000
EF / COP 0.60–0.75 0.82–0.99 2.0–3.5 (COP) N/A
Lifespan 8–12 yrs 15–20 yrs 10–15 yrs 15–20 yrs
Annual Energy Cost $350–$450 $280–$320 $140–$180 $50–$150
Estimated Payback Baseline 5–7 yrs 4–6 yrs 6–9 yrs

How Do I Choose the Right Water Heater for My Home?

What key factors influence water heater decisions?

Budget, space availability, household hot-water demand, fuel access, and long-term ROI are the primary decision drivers. For example, a large family (demand > 8 GPM) may prioritize a high-flow tankless unit, while a tight budget and small utility closet often point to a standard storage tank.

How can I systematically decide?

Use this step-by-step flow:

  1. Assess Budget:
    • Under $1,000 up-front — Storage tank
    • $1,000–$2,500 — Tankless or Heat pump
    • Over $2,500 — Consider Solar
  2. Check Space & Venting:
    • Limited closet space → Tankless (wall mount)
    • Unconditioned basement/garage → Heat pump (needs airflow)
    • Roof orientation south-facing → Solar collectors
  3. Calculate Peak Demand:
    • < 4 GPM → Single‐unit tankless or 40 gal tank
    • 6–8 GPM → Mid-range tankless or hybrid setups

When should I upgrade or replace my system?

You should consider upgrading or replacing your water heater once it reaches the end of its reliable lifespan or shows clear signs of declining performance. Storage‐tank units typically last 8 to 12 years, tankless systems 15 to 20 years, hybrids 10 to 15 years, and solar setups 15 to 20 years—so if your unit is older than these ranges, it’s likely nearing replacement. 

Additionally, watch for longer recovery times, frequent cold‐water “sandwiches”, or visible corrosion and leaks, which indicate inefficiency and potential failure. Proactive replacement not only prevents unexpected breakdowns but can also boost energy savings by up to 20–60%, depending on the new technology you choose.

When should I call a professional?

Whenever you encounter gas or electric related work, leaks, strange noises, or if your pressure relief valve is discharging water. Complex tasks such as anode‐rod replacement, descaling a tankless unit, or installing hybrid and solar systems also require professional expertise to ensure safety and code compliance. 

Even routine maintenance benefits from certified inspection, as technicians can detect worn valves, compromised insulation, or hidden leaks before they escalate. Effective water heater services guarantee that every component from venting to condensate drainage, is installed and maintained to factory specifications, delivering safe, efficient operation year after year.

Conclusion

Choosing the right water heater boils down to balancing upfront cost, long-term efficiency, space requirements, and household demand—from a $600 storage-tank model to a 3.0 COP hybrid or a solar system with an 8–12 year payback. By comparing EF/COP, installed cost, and expected lifespan, you can pinpoint the solution that delivers the best ROI for your Atlanta home.

Ready to move forward? Request a sizing consultation or personalized quote to lock in the optimal system and installation timeline. Universal Plumbing’s water heater service combines local expertise with industry leading techniques to ensure your new unit is sized, installed, and tuned for peak performance.

Top 24 Plumbing Tips Every Homeowner Must Know

Imagine a dripping faucet that keeps you up at night or a burst pipe flooding your laundry room. Basic plumbing skills help you turn these headaches into quick wins. Mastering simple fixes saves you time, cuts down on repair bills, and spares you the stress of emergency calls. Some jobs need a pro’s skills, like repiping your home, but you can handle many common fixes yourself, such as tightening a faucet or clearing a clog.

In this guide, we will cover essential tools, safety precautions, quick fixes for leaks and clogs, preventive maintenance routines, and seasonal plumbing care. Let’s dive in and give you the confidence to handle your next plumbing challenge.

Essential Plumbing Tools Tips for Homeowners

Whether you are tightening a fitting or clearing a slow drain the right tool makes all the difference. Below are four must-have items for every homeowner toolkit

1. Adjustable Wrench

When you need to loosen or tighten nuts on pipes or fixtures an adjustable wrench offers versatility. Choose a 10 to 14 inch tool made of chrome plated steel for corrosion resistance. Entry level wrenches cost around 10 to 20 dollars. Higher quality models run 30 to 40 dollars and last longer. After each use wipe it clean and apply a drop of light machine oil to the adjustment mechanism. Store it hanging on a pegboard to avoid damage

2. Hand Auger (Drain Snake)

A hand auger lets you push past the trap and break up minor clogs deep in your sink or shower line. A 3 foot cable with a quarter inch diameter navigates most residential fixtures. Basic augers start near 15 dollars and heavy duty models cost upward of 50 dollars. After clearing a clog rinse the cable thoroughly and dry it to prevent rust. Coil it loosely rather than bending it sharply to preserve the cable’s shape

3. Basin Wrench

Reaching behind sinks in tight cabinets is impossible with a standard wrench. A basin wrench uses a long handle and swivel head to grip nuts at odd angles. Look for an 8 to 10 inch reach and a jaw that self adjusts as you apply torque. Budget versions begin at 15 dollars. Professional grade tools can exceed 60 dollars but the smooth action and durability pay off if you tackle plumbing often. Store it alongside your adjustable wrench and keep the swivel joint free of debris

4. Plumbers Tape

Also known as Teflon tape this thin white thread seals threaded pipe connections and prevents leaks. Use half-inch width tape rated up to 260 degrees Fahrenheit. A standard roll costs under 5 dollars and covers dozens of joints. To apply wrap the tape clockwise around the male threads two to three times then assemble the fitting. Always clean threads first so the tape adheres properly Store the tape in a dry spot away from sunlight to keep it from becoming brittle

By choosing quality budget friendly tools and maintaining them properly you build a toolkit that serves you for years. Always follow the manufacturer’s instructions and never apply excessive force that could damage pipes or fittings. With these essentials on hand you will tackle most common plumbing tasks with confidence and ease.

Safety First Pre Repair Plumbing Precautions

Before you start any plumbing task it is crucial to set up a safe work area and know how to cut off water and power. Follow these steps to protect yourself and your home.

5. Step by Step Main Shut Off Valve Operation

Locate your home’s main shut off valve near the water meter or where the main line enters your house. Turn the valve handle clockwise until it stops to close the water supply. Open a faucet at the highest point in your home and another at the lowest point to drain remaining water from the lines. When you are ready to restore water turn the valve handle counterclockwise until it is fully open.

6. Common Injuries in Home Plumbing and How to Avoid Them

Injuries often include cuts from sharp edges on pipes or tools sprains from over torquing fittings and eye irritation from splashing water or chemicals. To avoid these wear sturdy gloves and safety goggles keep tools in good condition and use only gentle steady pressure when tightening or loosening connections.

7. Checklist for a Safe Work Zone

  • Ensure bright lighting so you can see under sinks and in cramped spaces
  • Provide ventilation if you use any chemical cleaners or sealants
  • Lay down a waterproof mat or old towels to protect the floor from spills
  • Keep your phone or a flashlight nearby in case you need to call for help

8. Importance of Documenting Valve Locations for Future Reference

After you locate and operate the main shut off valve take a photo or sketch a simple floor plan showing its position. Store this information near your breaker panel or in a home maintenance binder. That way in an emergency you or anyone else in your household can quickly find and close the valve without delay.

Quick Leak Detection and Temporary Fixes

Finding and stopping a leak fast can prevent water damage and mold growth. Use a clear method for inspection and know when to apply a temporary fix versus calling a professional.

9. How to Systematically Inspect Under Sinks and Behind Toilets

Begin at one fixture and work your way around the house. Look for water stains or pooling around pipe joints supply lines and trap connections. Run your fingers along pipes to feel for moisture. Check the floor and walls for discoloration or soft spots that indicate hidden leaks.

10. Pros and Cons of Moisture Meters vs Simple Paper Towel Checks

A moisture meter gives a numeric reading and can detect moisture behind walls or under floors. It costs between thirty and one hundred dollars but provides precise data. A paper towel or tissue test costs nothing and works well for visible leaks but it cannot find hidden damp spots. Use a moisture meter for complex leaks and paper towels for quick spot checks.

11. When a Temporary Patch Is Acceptable vs When to Schedule a Repair

Use a rubber clamp or epoxy putty to stop a small pinhole leak as a short term measure until you can arrange a full repair. Temporary patches work for a few days under low pressure. If the leak worsens, covers a large area or sits on a cast iron or galvanized pipe, plan a professional repair immediately to avoid burst pipes and major damage.

12. Safety Considerations with Epoxy Putty and Clamps

Wear gloves and safety goggles when handling epoxy putty since the uncured material can irritate skin and eyes. Follow the manufacturer’s instructions on cure time and temperature. When installing a clamp make sure it is snug but not overtightened to avoid crushing soft copper tubing or cracking brittle materials.

DIY Drain Cleaning Methods

Slow drains and minor clogs are common issues in every home and often you can fix them yourself with basic tools and safe cleaning methods. Here’s how to tell what you’re dealing with and how to respond effectively.

13. Signs You’re Dealing with a Simple Clog vs. a Deeper Blockage

If only one fixture like a kitchen sink or bathtub is draining slowly the clog is likely close to the drain opening or in the trap. Gurgling sounds of water backing up in multiple fixtures or foul odors suggest a deeper blockage in the main line. Simple clogs are usually manageable with DIY methods. For deeper issues involving sewer lines, call a licensed plumber.

14. Step by Step Guide to Using a Hand Auger Safely

  1. Remove the drain cover and insert the auger cable until you feel resistance
  2. Turn the handle clockwise to break up or hook the clog
  3. Slowly pull the cable out while continuing to rotate
  4. Run hot water for a few minutes to flush away loosened debris
  5. Clean the auger thoroughly before storing

Always wear gloves and eye protection while using a hand auger and never force the cable through sharp bends as it could damage pipes.

15. Environmentally Friendly Cleaner Recipes

Natural cleaners are ideal for routine maintenance and mild clogs. A common and effective mix is half a cup of baking soda followed by half a cup of white vinegar. Let it sit for fifteen to twenty minutes and then pour a liter of hot water to flush. This method is safe for all pipe types and works best for clearing greasy buildup and mild organic debris.

16. How Often to Schedule Enzymatic Treatments

Enzyme based drain cleaners break down organic material like hair and soap scum without harsh chemicals. For best results apply them monthly at night when the drain won’t be used for several hours. This keeps buildup from forming and helps maintain free flowing pipes in bathrooms and kitchens.

Plumbing Preventive Maintenance Tips

Preventing plumbing problems is often easier and cheaper than fixing them. A few simple checks each month and scheduled tasks throughout the year can extend the life of your plumbing system and help you avoid costly repairs.

17. Creating a Simple Homeowner Maintenance Calendar

Divide tasks into monthly, quarterly and annual categories and set reminders using a smartphone app or physical calendar. Monthly tasks include checking under sinks for leaks and testing faucet handles. Quarterly tasks can include flushing your water heater and inspecting appliance hose connections. Reserve major tasks like water heater cleaning and outdoor faucet inspections for spring or fall.

18. How to Safely Flush Your Water Heater

Turn off the power or gas supply and close the cold water inlet. Connect a garden hose to the drain valve and open it to flush out sediment. Open the pressure relief valve briefly to ensure it isn’t stuck. If water flows freely and shuts off properly it’s working well. This process prevents mineral buildup and helps maintain water heater efficiency.

19. Replacing Washers vs. Calling a Pro

Leaky faucets often result from worn washers or O rings. Replacing a washer costs under five dollars and takes less than thirty minutes. If the leak persists after replacement or the valve body is corroded call a professional. Attempting complex repairs without experience could damage parts and increase future repair costs.

20. Tracking Maintenance in a Home Journal or App

Use a dedicated notebook or a digital home management app to log dates of inspections, repairs and part replacements. Include details like water heater flush dates or washer replacements. This helps you stay on top of tasks and provides a maintenance history that can increase resale value and make future diagnostics easier.

Smart Installs & Simple Upgrades

Simple upgrades can boost performance and comfort without calling a plumber. Follow these tips for smooth installs and lasting results.

21. Identify Your Faucet or Showerhead Model

Before you buy parts take a close look at your existing fixture. Turn the water off and remove the handle or escutcheon plate. Note any stamped model numbers or brand logos. Measure the cartridge or connection size with a ruler. Snap a clear photo and compare it to online parts diagrams.

22. Step by step install guide with torque specifications

  • Turn off the water supply at the shut‑off valves below the sink or behind the shower.
  • Open the faucet or shower valve to relieve any pressure.
  • Remove the handle and escutcheon plate to expose the cartridge or shower arm.
  • Unscrew the retaining nut or mounting bracket using an adjustable wrench.
  • Pull out the old cartridge or unscrew the old showerhead.
  • Clean the valve body or shower arm threads with a soft brush.
  • Apply two to three wraps of plumber’s tape in the direction of the threads.
  • Insert the new cartridge or screw on the new showerhead until snug.
  • Use a torque wrench set between 10 to 12 ft-lbs to tighten the retaining nut or showerhead.
  • Restore the water supply and test for leaks.

23. Benefits of Low Flow Aerators Cost Savings and Eco Impact

Installing a low flow aerator on your kitchen or bathroom sink cuts water use without sacrificing pressure. At fifteen gallons per minute you save hundreds of dollars annually on water bills. Less water flow also means lower energy costs for hot water. Low flow aerators reduce your environmental footprint by conserving several thousand gallons of water each year in a single home.

24. Troubleshooting Common Installation Issues

If you notice a drip after install ensure that plumber’s tape fully covers all male threads and that fittings are aligned properly.. For uneven spray patterns on a new showerhead clear mineral deposits from the nozzles with a toothpick or soak the head in vinegar. If the handle feels loose, tighten the retaining nut inside the escutcheon. Always test your work by running water at full pressure for a minute and watching for leaks.

When to Call a Professional

While many minor repairs and routine tasks can be handled with the right tools and a little know-how, certain plumbing issues demand the expertise, equipment, and guarantees that only trained professionals can provide. Here’s why calling in a licensed plumber is often the smartest choice:

  1. Complex Diagnostics and Precision Repairs
  2. Compliance with Codes and Safety Standards
  3. Long-Lasting Solutions and Warranties
  4. Comprehensive Sewer and Drain Services
  5. Major Fixture Installations and System Upgrades
  6. Emergency Response and Safety
  7. Expert Advice and Preventive Planning

By partnering with experienced plumbing services, you gain access to the right tools, in‑depth knowledge, and industry‑backed guarantees that keep your system running smoothly. 

From routine inspections and complex repairs to full system upgrades, professional plumbing services provide lasting peace of mind so you can enjoy your home worry‑free of leaks and compliance issues.

Conclusion

You now have the tools and know‑how to tackle basic plumbing tasks, from emergency fixes to seasonal maintenance. Keep your toolkit organized, update your maintenance calendar regularly, and dive deeper with our Plumbing Maintenance Tips guide and Rapid Response Tips page for more detailed advice.

When you need reliable, expert help in Atlanta, Call Universal Plumbing today for prompt, expert service—day or night. Whether it’s a leak, a clog, or a complete upgrade, we’ve got Atlanta covered.

Busted Pipe: Causes, Signs, Prevention & What to Do Next

A busted pipe may quickly escalate from a minor issue to a plumbing emergency. Whether due to freezing temperatures, high water pressure, or aging plumbing, a water pipe burst may lead to extensive water damage, costly repairs, and even mold growth if not addressed immediately. In this definitive guide, we’ll walk you through the common causes of a pipe burst, how to identify the early warning signs and provide practical prevention tips to safeguard your home. 

We’ll also cover important insurance considerations—like does house insurance cover burst pipes?—and explain exactly what to do when a pipe bursts. By the end of this post, homeowners, property managers, and renters alike will be equipped with the knowledge to act swiftly, minimize damage, and keep their properties safe.

What is Pipe Bursting?

A pipe bursting occurs when a water pipe suddenly breaks due to factors like freezing, high pressure, or corrosion. This may result in water damage if not fixed quickly. A busted pipe may also lead to flooding your home, and increase water bills. Knowing what causes it and how to respond may help prevent costly repairs.

Pipes are especially vulnerable in cold weather when water inside freezes and expands, putting pressure on the pipe walls. Older or corroded pipes are also at risk, as they weaken over time and become more likely to break. Even small leaks may signal a bigger problem, it is important to watch for warning signs like low water pressure, damp spots, or strange noises in the plumbing system.

In this blog, our focus is primarily on the accidental type of burst—a situation where a pipe fails, leading to a busted pipe emergency. Understanding both definitions is useful: while homeowners are most likely dealing with the unexpected failure of a pipe, being aware of advanced repair techniques may help when discussing solutions with your plumbing professional.

Common Causes of a Busted Pipe

A busted pipe rarely occurs without a cause. Here are the key factors that may lead to a pipe burst:

1. Freezing Temperatures

When temperatures drop, water expands as it freezes. This expansion puts tremendous pressure on the pipes. If the pressure becomes too great, the pipe can crack or even burst. Homes in colder climates or areas with inadequate insulation are particularly vulnerable.

2. High Water Pressure

Excess water pressure can gradually weaken pipes over time. A sudden increase in water pressure can put excessive stress on a pipe, potentially resulting in a leak or rupture. Installing a water pressure regulator may help reduce stress on your plumbing system and lower the risk of pipe damage.

3. Corrosion & Aging Pipes

Over time, pipes made of older materials like galvanized steel may corrode. This corrosion thins the pipe walls, making them more susceptible to rupture. Regular inspections and upgrades to modern materials like copper or PEX may significantly reduce this risk.

4. Clogs & Blockages

Accumulated debris, grease, or mineral deposits may cause clogs, leading to a build-up of pressure behind the blockage. This increased pressure may force the pipe to burst at its weakest point.

5. Tree Root Intrusion

Tree roots naturally search for moisture and can infiltrate underground pipes. As the roots grow, they may cause a crack or completely break the water pipe, leading to a sudden water pipe burst.

6. Poor Installation & Low-Quality Materials

Sometimes the root cause is as simple as an improperly installed pipe or the use of substandard materials. A poorly constructed plumbing system can result in frequent failures and expensive repairs over time.

Understanding these causes is essential not only for effective repairs but also for implementing long-term preventive measures.

How to Know If a Pipe Has Burst

Early detection of a busted pipe may help you save from extensive water damage. Look out for these warning signs:

  • Unusually High Water Bills: A sudden spike in your water usage could indicate a hidden leak.
  • Low Water Pressure: If you notice a significant pressure drop, it might be due to a pipe burst causing water loss.
  • Water Stains or Damp Spots: Discoloration on walls, ceilings, or floors is a classic sign of water leakage from a burst pipe.
  • Strange Noises: Hissing or bubbling sounds when no appliances are in use may point to a hidden water leak.
  • Visible Puddles: Unexpected pools of water or moisture in areas that should remain dry signal that a pipe might have failed.

Prompt detection is key. If you start to see any of these signs, it’s important to take immediate action to prevent further damage.

How to Prevent Pipes from Bursting

Preventing a busted pipe involves both proactive maintenance and emergency preparedness. Here are some tried-and-true strategies to ensure your pipes remain in good condition:

  • Insulate Your Pipes: Use foam insulation on pipes that are exposed to cold temperatures, particularly those in unheated areas like basements and crawl spaces.
  • Maintain a Steady Indoor Temperature: During extreme weather, keep your home at a consistent temperature—even when you’re away—to reduce the risk of freezing.
  • Let Faucets Drip: In particularly cold weather, allow a slow drip from faucets to keep water moving, which may help prevent freezing.
  • Regular Plumbing Inspections: Have your pipes inspected regularly by a professional to catch early signs of wear, corrosion, or clogs.
  • Install a Water Pressure Regulator: This device helps to maintain a safe water pressure level, reducing stress on your pipes.
  • Replace Aging Pipes: Upgrading old or damaged pipes with high-quality materials such as copper or PEX may prevent future issues.
  • Quick Shut-Off Measures: Familiarizing yourself with the location of your main water shut-off valve may help you respond more quickly to stop the flow of water in an emergency.
  • Document for Insurance: Regularly documenting the condition of your pipes and any repairs may be helpful when filing an insurance claim in the event of a pipe burst.

By implementing these preventive measures, you may reduce the risk of a pipe burst and help extend the overall lifespan of your plumbing system.

Does Home Insurance Cover Burst Pipes?

One of the most common questions homeowners ask is, does house insurance cover burst pipes? The answer largely depends on the specifics of your policy and the circumstances surrounding the burst:

  • Accidental vs. Negligence: Some homeowner’s insurance policies may cover sudden and accidental pipe bursts. It is best to check with your insurance provider for details on your specific policy. If the damage is due to long-term neglect—like failing to maintain aging or corroded pipes—coverage might be denied.
  • Policy Details: Coverage may vary widely between insurance providers. It’s essential to review your policy and understand the terms, especially regarding water damage and maintenance responsibilities.
  • Documentation is Key: In the event of a burst, document the damage with photos and videos. This evidence is critical when filing a claim and may expedite the process.
  • Additional Riders: Some homeowners may choose to add specific riders to their policy that cover plumbing emergencies, which might offer extra protection in the event of a busted pipe.

Ultimately, it’s wise to have a conversation with your insurance provider to fully understand your coverage options and ensure you’re adequately protected.

When to Call a Professional Plumber

Even with the best preventive measures, sometimes a busted pipe occurs unexpectedly. In these cases, the expertise of a professional is essential. If you notice any signs of a burst—such as unexplained water damage, persistent low water pressure, or hidden leaks—it’s time to call in the experts.

For reliable and rapid response, consider the emergency plumbing services by Universal Plumbing. Our emergency plumber team is equipped to handle everything from minor leaks to major pipe replacements. Remember, Our professional plumbers have the training and tools to safely assess and repair your plumbing system, ensuring that hidden issues don’t escalate into larger, more costly problems.

Conclusion

A busted pipe may cause significant water damage to your home if not addressed immediately. Understanding the common causes of burst pipes such as freezing temperatures, high water pressure, corrosion, and poor installation—allows you to take proactive steps to protect your property. Early leak detection is essential, watch for warning signs like water stains, unexpected increases in water bills, and low water pressure. Knowing how to respond when a water pipe bursts, from shutting off the main water supply to contacting a licensed emergency plumber can help minimize damage. Additionally, reviewing your home insurance policy for water damage coverage may help you save time and reduce costs in the aftermath of a plumbing emergency. For emergency pipe repair or preventative plumbing services, consult a trusted local plumber to ensure your plumbing system remains in top condition.

Take prompt action, stay informed, and don’t hesitate to call Universal Plumbing if you suspect any issues. Your home is your sanctuary—protect it by being prepared for even the unexpected.

FAQs

What is a busted pipe?
A busted pipe refers to a plumbing failure where a pipe suddenly ruptures, leading to water leaks potential water damage to the property, and costly repairs. Factors such as freezing temperature, high water pressure, pipe corrosion, or blockage. 

Is a burst pipe an emergency?
Yes, a burst pipe is generally considered a plumbing emergency. Immediate action is required to stop the water flow and minimize damage.

What happens if you have a burst pipe?
If a pipe bursts, water will leak rapidly, potentially causing water damage, structural issues, and mold growth if not promptly addressed.

How do you fix a busted pipe?
Fixing a busted pipe involves shutting off the main water supply, draining the pipes, and calling a professional plumber to repair or replace the damaged section.